Non-destructive techniques in Photoshop allows the designer to make modifications without altering the original picture.
There are several techniques that are non-destructive and we are gonna see a few of them in this post with examples.
1. Adjustment Layers
If you are a regular Photoshop user then you might be familiar with features like ' brightness, levels, color balance,hue/saturation'. You can make several changes to your image individually by using them on separate duplicate layers but you cannot make changes to them later.
Well, now you have a solution for that using the 'adjustment layer' feature in Photoshop.
Open the picture you want to alter.

Then go to, Window - Adjustments. The adjustment window will pop up.

Choose the action you want to perform by clicking the icons in the pop-up box.

I wanted to change the levels of my image. After the levels icon is clicked, a pop-up window appears. You can notice that a separate layer has been created for the levels. The values can be adjusted as required.

Next, I am going to use the 'photo filter' option. I click it and again a separate layer is created. Make any changes you want.

Now you can see that there are two separate layers created above the original image so that you can make changes to them anytime you want.Cool!

2.Smart Filters
Even wondered if the changes you make to the filters can be altered. Well, that can happen by using 'Smart Filters'.
Open the picture on which you want to apply your filters

Now go to Filter - Convert for Smart Filters

Now a pop-up box appears prompting you that the current layer will be converted into a smart object. Click OK.

Now you can see that the current layer has been converted into a smart object will a little icon on it.
Next, apply the filter which you want. For example, I want to sharpen my image so I am going to select Smart Sharpen. [ Filter -Sharpen - Smart Sharpen ]

After selecting the desired amount of values you want, click 'ok'. Now you can see that the Smart Filter is applied separately below the layer so that you can alter it anytime you want without affecting the actual layer.

Similarly, you can apply multiple filters and change them at any time you want. This is the sharpened image after applying the filter.

3.Applying a layer style to multiple layers
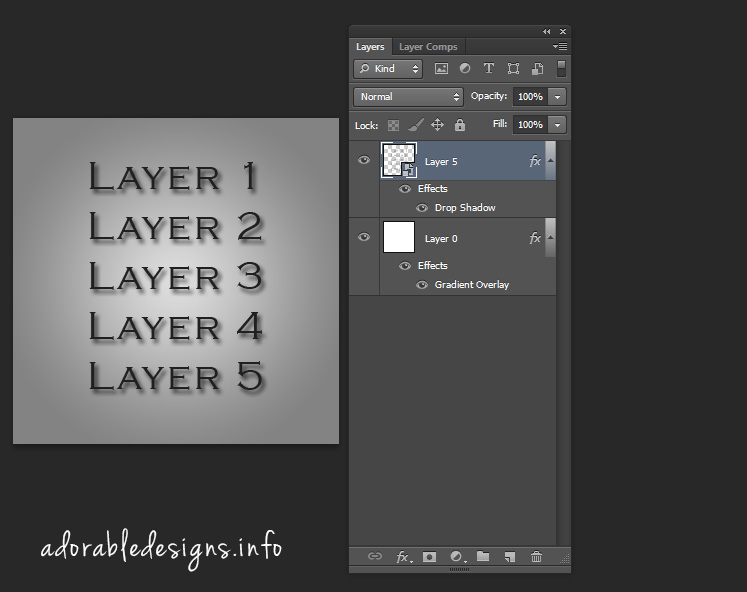
One way of applying a layer style to another is by the following steps. In this example, I have five layers and I want to apply the "Drop Shadow" property to all the other layers.
Step 1: Open the file

Step 2: Right-click on one layer and select

Step 3: Select the layer style which you want to apply. Here I have chosen the "Drop Shadow" property.

Step 4: Now in order to duplicate the property, I right-click the layer1, and select "Copy Layer" Style

Step 5: Then I go to layer 2 and right-click it and choose the "Paste Layer Style" option.

Now the same style is duplicated in layer 2.

This is fine for just 5 layers but what if I had about 100 layers. Manually performing these tasks will be time-consuming. And what if I want to change the style later. Then I have to manually change it for all other layers, which is a very hectic task.
This is where we have "Convert to Smart Filter " comes to the rescue. With that, duplicating layer styles to many many layers becomes a piece of cake.
So let us see how it is done.
Step 1: Open the file.
Step 2: Select the layers for which you want to apply the same style. Then right-click and select "Convert for Smart Filters"

Step 3: Now you see that the same style has been copied to every other layer with just 1 step.

If you want to change to another layer style, you can easily do it by simply changing the "Drop Shadow" into any effect of your choice just once and it will be reflected in all the other layers.

There are several techniques that are non-destructive and we are gonna see a few of them in this post with examples.
1. Adjustment Layers
If you are a regular Photoshop user then you might be familiar with features like ' brightness, levels, color balance,hue/saturation'. You can make several changes to your image individually by using them on separate duplicate layers but you cannot make changes to them later.
Well, now you have a solution for that using the 'adjustment layer' feature in Photoshop.
Open the picture you want to alter.

Then go to, Window - Adjustments. The adjustment window will pop up.

Choose the action you want to perform by clicking the icons in the pop-up box.

I wanted to change the levels of my image. After the levels icon is clicked, a pop-up window appears. You can notice that a separate layer has been created for the levels. The values can be adjusted as required.

Next, I am going to use the 'photo filter' option. I click it and again a separate layer is created. Make any changes you want.

Now you can see that there are two separate layers created above the original image so that you can make changes to them anytime you want.Cool!

2.Smart Filters
Even wondered if the changes you make to the filters can be altered. Well, that can happen by using 'Smart Filters'.
Open the picture on which you want to apply your filters

Now go to Filter - Convert for Smart Filters

Now a pop-up box appears prompting you that the current layer will be converted into a smart object. Click OK.
Now you can see that the current layer has been converted into a smart object will a little icon on it.
Next, apply the filter which you want. For example, I want to sharpen my image so I am going to select Smart Sharpen. [ Filter -Sharpen - Smart Sharpen ]

After selecting the desired amount of values you want, click 'ok'. Now you can see that the Smart Filter is applied separately below the layer so that you can alter it anytime you want without affecting the actual layer.

Similarly, you can apply multiple filters and change them at any time you want. This is the sharpened image after applying the filter.

3.Applying a layer style to multiple layers
One way of applying a layer style to another is by the following steps. In this example, I have five layers and I want to apply the "Drop Shadow" property to all the other layers.
Step 1: Open the file

Step 2: Right-click on one layer and select

Step 3: Select the layer style which you want to apply. Here I have chosen the "Drop Shadow" property.

Step 4: Now in order to duplicate the property, I right-click the layer1, and select "Copy Layer" Style

Step 5: Then I go to layer 2 and right-click it and choose the "Paste Layer Style" option.

Now the same style is duplicated in layer 2.

This is fine for just 5 layers but what if I had about 100 layers. Manually performing these tasks will be time-consuming. And what if I want to change the style later. Then I have to manually change it for all other layers, which is a very hectic task.
This is where we have "Convert to Smart Filter " comes to the rescue. With that, duplicating layer styles to many many layers becomes a piece of cake.
So let us see how it is done.
Step 1: Open the file.
Step 2: Select the layers for which you want to apply the same style. Then right-click and select "Convert for Smart Filters"

Step 3: Now you see that the same style has been copied to every other layer with just 1 step.
If you want to change to another layer style, you can easily do it by simply changing the "Drop Shadow" into any effect of your choice just once and it will be reflected in all the other layers.
